Light Source Annotation Intro Course


Telegram Group Links | Join, Share
!Shubh Shuruaat Start Pay ke Sath!
Start-Pay-YouTube
startpayonline.com/loan Return Home Page
STARTPAYONLINE
Check Cibil Score Online & Get Your Credit Report For Free
Bank Loan Knowledge Return Home Page
Knowledge Base Articles - Jobs-Apply
एंटईटर लाइट सोर्स एनोटेशन इंट्रो कोर्स में आपका स्वागत है!
एंटईटर लाइट सोर्स एनोटेशन पाठ्यक्रम में आपका स्वागत है। यह पाठ्यक्रम आपको लाइट सोर्स एनोटेशन कार्यों में प्रयासकर्ता बनने में मदद करने के लिए डिज़ाइन किया गया है।

Light Source Annotation Spec Document
Lidar Linking Annotation | IN PROGRESS Last Updated 23/10/23
Contents


कार्य का सारांश
इन कार्यों में आप प्रकाश स्रोत वस्तुओं (एलएसओ) की पहचान और व्याख्या करने वाले कई फ़्रेमों से गुजरेंगे। एलएसओ को कई फ़्रेमों में एक बाउंडिंग बॉक्स के साथ एनोटेट करने की आवश्यकता है। एकाधिक फ़्रेमों में एक ही ऑब्जेक्ट के लिए एक ही बाउंडिंग बॉक्स आईडी का उपयोग करने की आवश्यकता होती है। एक बार जब ऑब्जेक्ट को बाउंडिंग बॉक्स के साथ एनोटेट किया जाता है, तो आपको इसकी व्यक्तिगत विशेषताओं पर प्रतिक्रिया देने की आवश्यकता होगी, जिसमें वाहन प्रकार और प्रकाश स्रोत ऑब्जेक्ट दिशा शामिल है।
नोट: प्रत्येक फ़्रेम में प्रकाश स्रोत ऑब्जेक्ट को एनोटेट करना सुनिश्चित करें।
कार्यप्रवाह
बेहतर एनोटेशन दक्षता और सटीकता के लिए, एनोटेशन प्रक्रिया से पहले और उसके दौरान विचार करने के लिए यहां कुछ अंतिम सामान्य सिफारिशें दी गई हैं।
1. एनोटेशन प्रक्रिया शुरू करने से पहले, इसकी जटिलता का अंदाजा लगाने के लिए पूरे अनुक्रम से गुजरें। ध्यान दें कि क्या बड़ी मात्रा में या कई अलग-अलग प्रकार के एलएसओ हैं, यदि रुकावटें बार-बार आती हैं, इत्यादि। ऐसा करने से एलएसओ भी प्रकट हो सकते हैं जो अनुक्रम में एक बिंदु पर अहंकार वाहन के पास और दूसरे बिंदु पर दूर के क्लस्टर में दिखाई देते हैं।
2. एक फ्रेम के भीतर एलएसओ की स्थिति का बेहतर अनुभव प्राप्त करने के लिए, पूर्ववर्ती और निम्नलिखित फ्रेम की जांच करना उपयोगी हो सकता है।
3. संपूर्ण क्लिप के संदर्भ को ध्यान में रखते हुए, एलएसओ पर कई संपत्तियों को अधिक आसानी से और सटीक रूप से एनोटेट किया जाएगा। जब कोई वाहन अहंकार वाहन के पास होगा तो संपत्ति वाहन का प्रकार सबसे आसानी से पहचाना जा सकेगा।
लेबल और गुण वर्गीकरण
|
Group Label समूह लेबल |
Attributes गुण |
Value कीमत |
|
Light Source Objects प्रकाश स्रोत वस्तुएँ |
Vehicle Type वाहन का प्रकार |
|
|
Light Source Object (LSO) Direction प्रकाश स्रोत वस्तु (एलएसओ) दिशा |
|
General Annotation Rules:
सामान्य एनोटेशन नियम:
|
Rule नियम |
Description विवरण |
Example उदाहरण |
|
When should you annotate an LSO? |
Annotate all fully or partially visible LSOs which have either:
1. Visible and active light sources in the current frame;
or
2. No visible light sources in the current frame (e.g., due to occlusion by roadway divider, or the LSO leaving the frame) |
Frame 1: Two LSOs labeled.
Frame 2: LSO on the left starts to be occluded.
Frame 3: LSO is completely occluded . Incorrect response for Frame 3: LSO is labeled even if it is completely occluded in one frame.
Correct response for Frame 3: LSO is not labeled because it is completely occluded in this frame. |
|
Frame annotation |
Annotate the light sources in every frame of the task. Tasks usually have 450 frames.
Note: Make sure to annotate the light sources that appear in multiple frames with the same object ID. |
|
|
Bounding Box annotation |
It is important that the bounding box is drawn to enclose as much of the LSO in question as possible, while avoiding as many other light sources that are not attached to the LSO |
|
|
Bounding Box IDs |
If an object can be seen in multiple frames, each bounding box surrounding the object should have the same ID across all frames. |
|
|
VehicleType attribute should be constant throughout the entire sequence. |
When a bounding box is created to label a LSO, the VehicleType attribute should remain the same throughout the entire sequence.
If there is the need to change that attribute, a new annotation must be made. |
|


How to annotate a bounding box correctly?
In the following examples, the correct way to annotate the bounding box is indicated with a green rectangle. Incorrect annotations are indicated with red rectangles.
|
Example |
Observations |
|
|
The example image contains a few different vehicles, some of which are only partially visible. Notice how the bounding box has to be drawn to enclose the entire vehicle, not just the visible light sources.
Also note that the partially occluded car in the back has been annotated according to the expected shape of the complete vehicle, not just the visible part. |
|
|
Notice how the full approximated shape of the cars is taken into account in this example image, despite some of the vehicles occluding each other |
|
|
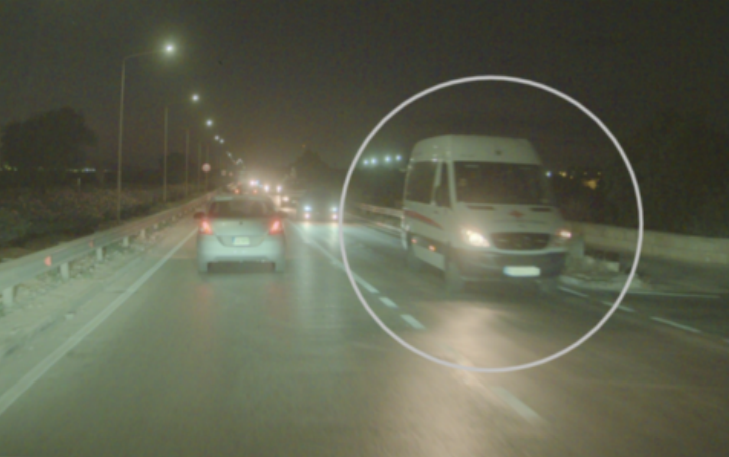
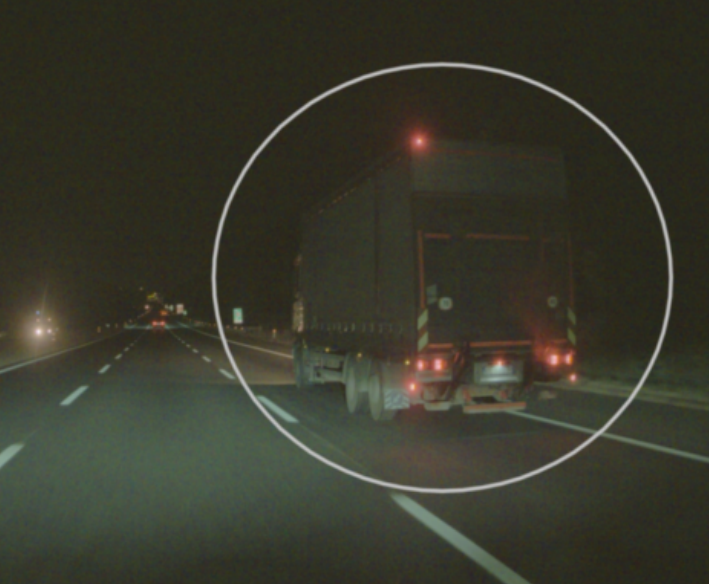
These two example images illustrate how to annotate a large vehicle, such as a truck, as it approaches the ego vehicle. Notice how the correct annotations always enclose the entire vehicle, even if most of it is out of frame. |
|
|
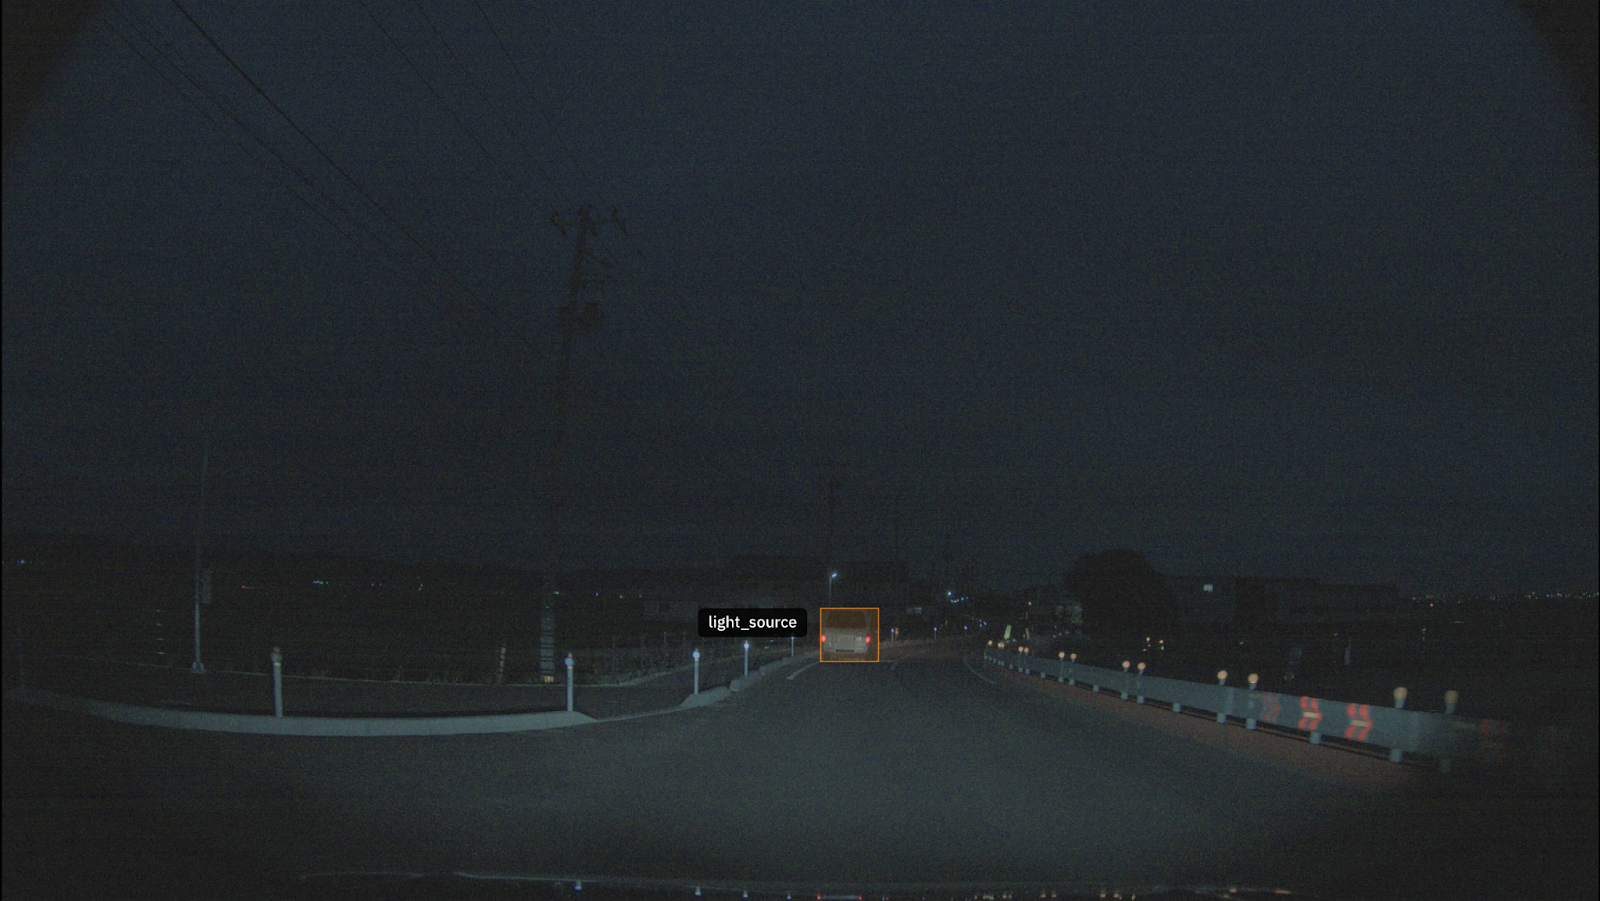
This example image has an oncoming transporter closest to the ego vehicle, which is reflected in its bounding box. In this case it might be necessary to scan a few frames in advance to get an idea of the shape of the vehicle. |
|
|
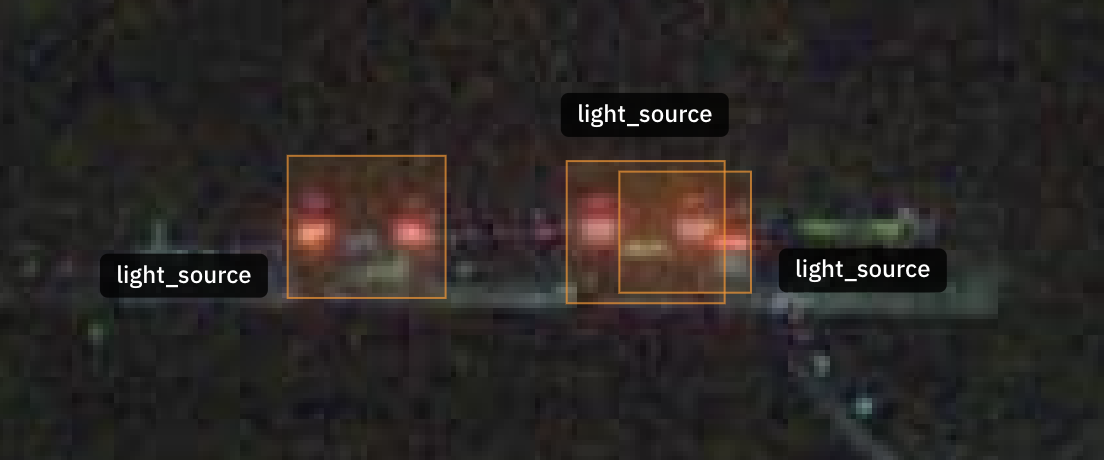
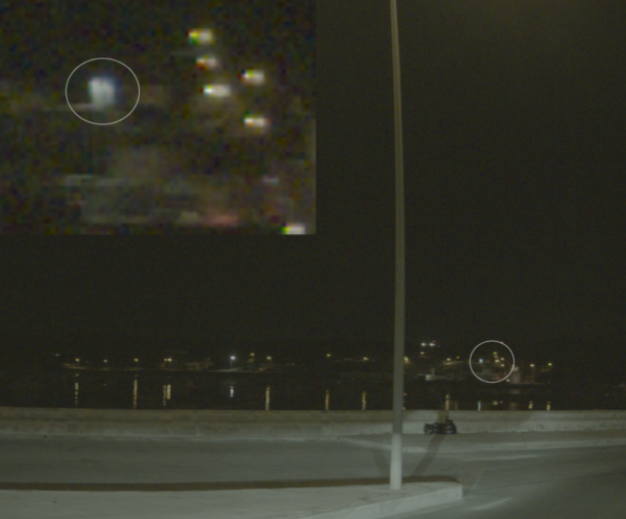
These images illustrate how to annotate the bounding box for LSO with a VehicleType of “InconclusiveCluster” |
|
|
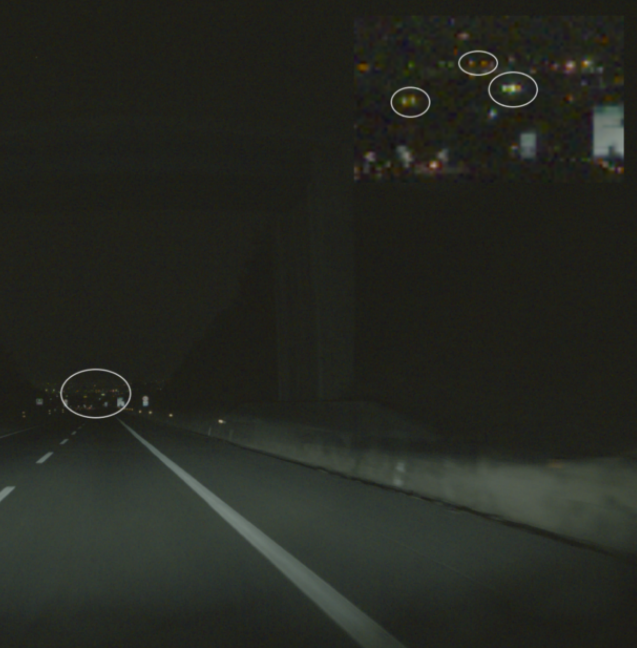
This example image illustrates a case of an “InconclusiveCluster” annotated in the distance as well as a vehicle where all light sources are occluded. Notice how even when no light sources are currently visible, the corresponding LSO should still be annotated as usual. |
|
|
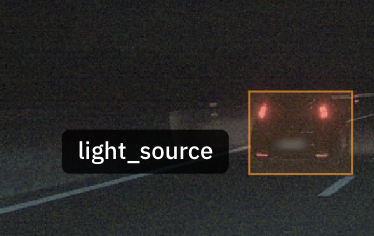
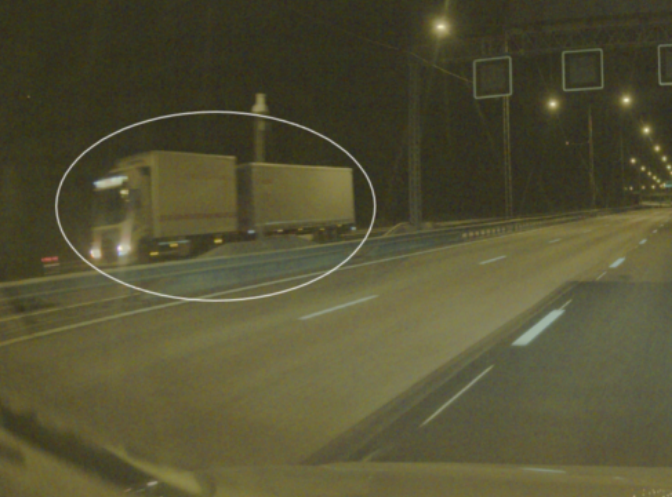
Finally, this example demonstrates how to handle “Trailer” LSOs towed by “Car” LSOs. In this image, the correct way to annotate the bounding box around the “Trailer” is illustrated. |


Vehicle Type Attribute
|
Type |
Description |
Example |
|
Car |
A Car is any standard-sized vehicle typically capable of seating around 2 to 7 people. Compared to other, larger, vehicle types, the driver will be positioned lower down closer to the road. |
|
|
Transporter |
A Transporter is identified as somewhat larger than a typical car. Often, a transporter will have a larger trunk or may seat around a maximum of 9 passengers. The driver may be situated slightly higher up above the road than in a car. Examples of what should be considered a transporter include delivery vans as well as large recreational vehicles like campers |
|
|
Truck |
A Truck is a large-sized vehicle commonly used to transport goods. The driver will also be positioned higher up above the ground compared to both cars and transporters. |
|
|
Bus |
A Bus is a relatively large vehicle typically seating more than 10 people used for public transport. |
|
|
TrainTram |
The TrainTram type includes rail-bound vehicles like trains and trams. |
|
|
Motorcycle |
A Motorcycle is any motorized two-wheeled vehicle, including actual motorcycles, scooters and mopeds, but excluding e-scooters. |
|
|
BicycleEscooter |
The BicycleEscooter type includes other types of two-wheeled vehicles such as bicycles and escooters. Compared to the motorcycle type, these vehicles will generally operate at lower velocities . |
|
|
Trailer |
A Trailer is any unpowered vehicle towed by another vehicle type except for trucks. Note that while trucks technically have trailers too, for these annotation instructions, they are considered part of the same “Truck” LSO, not as separate “Trailer” LSOs. When towed by other vehicle types though, the trailer should be annotated as its own LSO with its own main lights. |
|
|
Inconclusive |
Inconclusive is applicable in situations where it is reasonably certain that a few light sources are attached to a single vehicle, but it is not possible to determine what type of vehicle it is. |
|
|
InconclusiveCluster |
InconclusiveCluster is applicable in situations where it is reasonably certain that a cluster of light sources is attached to one or more vehicles, but it is not possible to cleanly separate each individual vehicle. This often occurs at far distances on crowded highways. |
|
|
Uncertain |
Uncertain is applicable when it is possible that one or more light sources are attached to one or more vehicles, but a typical human would not be able to confirm this with certainty. In other words, the difference compared to the “Inconclusive” or “InconclusiveCluster” types is that an “Uncertain” LSO might be something completely irrelevant to the LSOD task, but it is hard to tell with certainty. |
|
|
Other |
Other refers to any other type of identifiable vehicle that has not already been explicitly listed. |
|


Light Source Object (LSO) Direction Attribute
|
Attribute |
|
Example |
|
Oncoming |
Driving towards the Ego Vehicle. |
|
|
Proceeding |
Driving away from the Ego Vehicle. |
|
|
Crossing |
Driving across the Ego Vehicle. |
|
|
Uncertain |
Select “Uncertain” for de LSO Direction Attribute whenever you are unable to identify the Light Source Direction due to the object being too far away or it being in a position where it is not possible to determine its direction, |
|


Annotation Examples
4 Annotation Examples
This section contains a number of examples demonstrating how some potential scenarios should be
annotated.
|
Example |
Observations |
|
|
This example image shows a somewhat busy highway scenario. Notice how the highlighted pair of trucks have their VehicleBoundingBox2Doverlapping due to the rear of the left-most truck being occluded by the right-most truck. Also note that individual light sources also have an bounding box in the example image, this is due to that the image originates from development instruction. Individual light sources are not relevant for validation. |

|
Example |
Observations |
|
|
Compared to the previous example, this image shows a less busy scenario. A few things are still worth noting though, such as how the VehicleBoundingBox2Dof each of the annotated LSOs are drawn to enclose as much of their respective vehicles as possible. It might not be entirely clear given just this frame what shape each vehicle has, and therefore howits bounding box should be drawn. In cases like this it is important to look at all frames in the sequence to get a feeling for what the vehicles look like, type they are, how they move, and so on. |
|
|
This example shows how to handle instances where a “Car” LSO is towing a “Trailer” LSO. Both objects are separately annotated. Also note that individual light sources also have an bounding box in the example image, this is due to that the image originates from development instruction. Individual light sources are not relevant for validation. |


Move edge down 1 px
Down
Move edge down 5 px
Shift
Down
Move edge left 1 px
Left
Move edge left 5 px
Shift
Left
Move edge right 1 px
Right
Move edge right 5 px
Shift
Right
Move edge up 1 px
Up
Move edge up 5 px
Shift
Up
Select left edge
A
Select right edge
D
Select top edge
W
Common Actions
Copy annotation
Ctrl
C
Copy annotation attributes
Ctrl
Shift
C
Paste annotation
Ctrl
V
Paste annotation attributes
Ctrl
Shift
V
Redo
Ctrl
Shift
Z
Ctrl
Y
Undo
Ctrl
Z
Image Adjustments
Decrease brightness
Shift
V
Decrease contrast
Shift
X
Decrease rotation
Shift
-
Increase brightness
Shift
B
Increase contrast
Shift
C
Increase rotation
Shift
=
Interface Toggles
Crosshairs
Z
Show/hide original annotations
B
Toggle annotation fill
Space
Toggle annotation selector
S
Toggle center lane visibility
Shift
9
Toggle complete/edit annotation
Enter
Toggle Corner Markers
X
Toggle cross section visibility
Shift
8
Toggle cursor coordinates
C
Toggle panning
P
Toggle point snapping
K
Toggle Point to Reveal Prelabels tool
Shift
D
Toggle ruler
R
Labeler Tools
Draw Box
Shift
4
Link annotations
Shift
A
Scene Navigation
Next attribute value
Ctrl
]
Next frame
]
Previous attribute value
Ctrl
[
Previous frame
[
Reset zoom
0
Select next frame
Shift
]
Select previous frame
Shift
[
Zoom in
=
Zoom out
-
Miscellaneous
Cycle details to show
G
Cycle interpolation mode
Shift
T
Delete selected annotation
Del
Backspace
Delete selected annotations from all frames
Shift
Backspace
Shift
Del
Hide overlaps with linked annotations for selected annotations
Shift
O
Hide overlaps with linked annotations for selected annotations
Shift
I
Predict frames
T
Save annotations
Ctrl
S
Select next annotation
N
Select previous annotation
Shift
N
Show lint errors
E
Show/hide annotations
H
Show/hide comments sidebar
Ctrl
H
Show/hide connections
Shift
Q
Show/hide labels
L
Show/hide link highlights
Shift
K
Show/hide OSM annotations
Shift
0
Show/hide selected annotations
Ctrl
Shift
K
Unselect annotation
Esc
Autolink
Ctrl
Shift
L
Open/close shortcuts menu
/
Show task feedback
?
Show task instructions
I
Toggle full screen
Light Source Annotation Spec Document
10 posts
Work Surveys - Other's Job
Remote Freelancer Hub
Get Your FREE Remote Account Today!
Remote Freelancer Hub
Get 14% Off Remote's EOR Service
नवीनतम उपलब्ध सर्वेक्षणों तक पहुंचने के लिए रिफ्रेश करें।
