Updated instructions
Mars Webcam Semseg Spec Document
[External] Mars Semseg Spec Document_2.1


Telegram Group Links | Join, Share
2D Semseg | IN PROGRESS
Oct. 7, 2020 Update: Edge cases and clarification
March 30,2021 update : Image change and content redistribution
January 25 2022 Update: Added workflow, “back to top” bookmarks and new clarifications
February 9 2022 Update: Adjusted workflow changes
February 1 2023 Update: Adjusted the Out of scope Criteria #5 for belly buttons to knee level, now a person’s torso is completely in scope and should be labeled as “good_data? Yes” unless their knee is visible; added more examples of pre existing criteria
January 16 2024 Update: Added a new case in the “Edge Cases and Clarifications” section (at the end)
April 10 2024 Update: Added more cases to “Edge Cases and Clarifications” section
Contents
- Task summary
- Labels & Attributes Table
- Good task example
- Workflow
- Edge cases and clarifications
- Annotation rules
- Labels & Attributes Description/Examples
- Critical vs. Non-Critical Errors


Task summary
Determine if you should label people in the webcam images, making sure to include accessories these people may have or anything directly in front of them (occluding the person), otherwise leave unlabeled.
Labels & Attributes Table
|
Label |
|
Person |
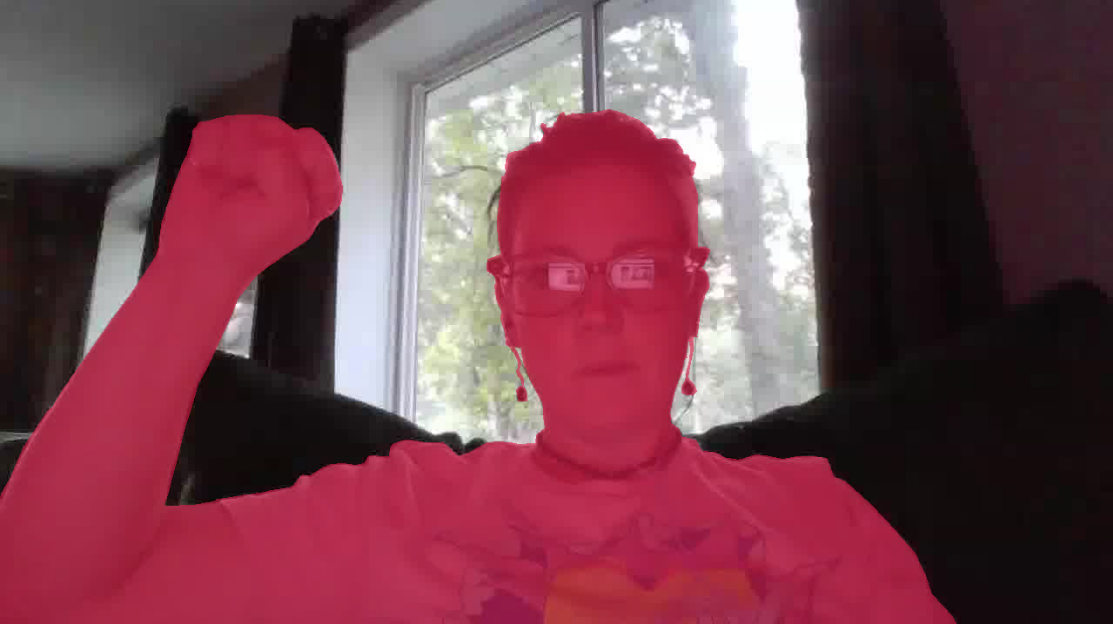
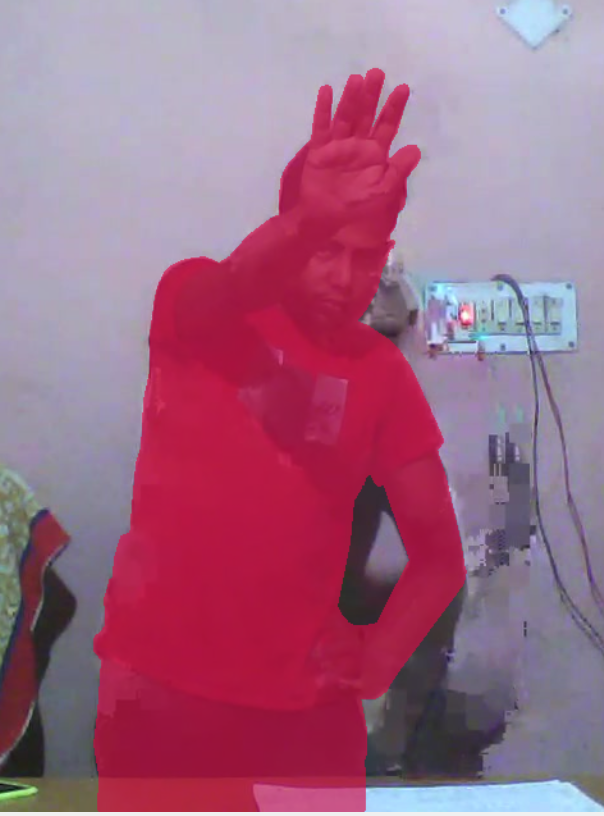
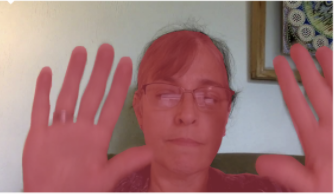
This task is a perfect example of the quality we should strive for, in this case the task takes into account thin hair strands, accessories (dangling earrings) and overall the tightness of the annotation to the person within the picture.
The workflow is meant to give you a general direction of how you should work to ensure your work is efficient and reaches our quality standards. You can always come back to this section in case you forget what you are supposed to do next.
Workflow Diagram

Workflow Explanation
Whenever you receive a completely new task you need to judge if the image is within the project’s scope or if it is out of scope. If the image is within scope, then you are able to start annotating the task, if the task is out of scope, you should only mark it as such, and then submit it.
The criteria of how you can determine if a task is within scope or not can be seen in the “Out of Scope Criteria” section of this document, and the way you mark the task as out of scope is by selecting on the right side of the screen if the task is good data or not.

By selecting “No” you are saying that the task should not be annotated since it is out of scope and by selecting “Yes” you will need to annotate the task.
When you start to annotate a task you are presented with five tools that you can work with, you can select any of these tools to achieve your goal as you see fit. These tools are:
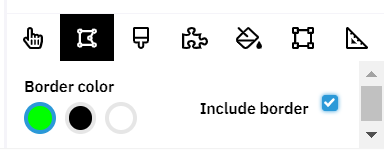
- Polygon fill: This tool allows you to select the area you want to annotate with by selecting the perimeter of the area with dots so that it can have as many sides as you want and with the desired shape.
You can change the color of the border in case you prefer other colors or if they are easier to see for you and also if you want the border itself to be considered for the area that is going to be annotated.
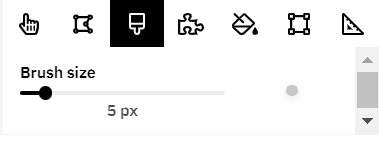
- Brush: This tool will allow you to annotate the task by turning your cursor into a circular shape that you can use to “paint” the task with.
You can change the size of the brush in case you need a bigger or smaller brush.
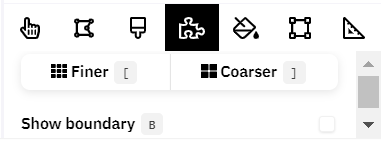
- Boundary: This tool allows you to annotate predetermined chunks of a task.
You can make the chunks bigger or smaller according to your needs, you can also see all of the chunks by pressing “B”.
- Flood fill: This tool allows you to fill the middle section of an annotated area.
We recommend using this tool with the “Boundary” tool so that you can mark the edges with the “Boundary” tool and use this tool to fill the in-between area.

- Auto segment: This tool will allow you to select a square area and remotasks will automatically select an area to annotate it. This is merely a guess from part of the tool so it is not as exact and should only be used for initial annotations and then use another tool to refine the annotation.
You can make it so the tool annotates a bigger part of the area you select by changing the “Threshold” setting, the smaller the threshold it will annotate a bigger area, the bigger the threshold, it will annotate a smaller area.

The other two tools that you can use and are at each end of the tool bar are:
- Select: This tool is just the regular cursor that allows you to select different objects within Remotasks

- Ruler: This tool allows you to measure any part of the task, this tool is useful to determine if you need to annotate edge cases within the task or not.

We recommend that you use a combination of all of these tools so that you can annotate with accuracy and efficiency
Once you have finished annotating the task you can submit it so that it can be reviewed. Remember that if you are unsure about how the task has to be annotated you can always refer to this document to get a clarification, if the document does not answer your question you can always openly ask in the Discord so that other people can help you out.
Edge cases and clarifications
|
Edge Case |
How to Handle It |
Example |
|
“Good data?” attribute when a person is being covered by another object.
|
In these cases if a person is being covered by an object (Ex. A desk, a table, a chair, a blanket, etc) and you cannot see at least a small part of their body touch the edge of the photo then it is bad data (Good data?: No)
You should consider the person’s torso and not just their arms for it to be considered as “covered”
If the person is being covered but their arms are reaching the lower edge of the photo it should still be considered as bad data (Good data?: No) Unless their arms are being used to cover most of the item that is covering them and creating the illusion that all of their body is touching the lower edge of the photo |
The photos on the first column are examples of someone being covered and it should be bad data (Good data?: No)
In this example the subject’s arms are touching the lower edge of the photo but we can see that her torso is not touching the edge, so in this case it is also bad data (Good data?: No)
Annotation should not go through objects like this, this is INCORRECT |
|
Broken images / artifacts in the pictures |
Remember the 12 Out of Scope Criteria that the project has. If the picture is presenting any artifacts within the picture regardless of where it is, then it is bad data (Good data?: No) The artifacts can be in the subject or in the environment around the subject, regardless it is considered as bad data
YOU SHOULD NOT CONFUSE ARTIFACTS WITH LOW QUALITY IMAGES
This is a low quality image that should be annotated |
Artifacts can appear at varying degrees distorting the image a lot, or not so much, regardless of the amount of artifacts, it should still be considered as bad data |
|
Objects in front of the person and accessories
|
|
Example: headphones/earphones (excluding wires), glasses, and hat
|
|
Cables from headphones or earphones
|
|
DO NOT label the wires if no human background in the back
|
|
Artifacts in pictures
|
Please keep estimates of the remainder of the person's body.
|
In this case, this tasks is not considered as corrupted since the artifact is only present in a minimal portion of the task
|
|
Thin hair / Messy hair |
Objects thinner than 2 pixels SHOULD NOT be annotated |
|
|
Gaps between thick strands in hair
|
Gaps LESS than 5 pixels can be IGNORED. Gaps WIDER than 5 pixels SHOULD BE LABELED as background. |
|
|
Overlapping textures/colors |
If there are any overlapping textures/colors between “Person” and “unlabeled,” please label as accurately as possible.
In the example to the right, the subject’s headset should be labeled as “Person” while the monitor behind him should be left unlabeled. |
- Notice how the color of subject’s headset blends in with the monitors behind him. Exclude the monitors from the “Person” label.
|
|
Image Blur and Quality |
If there are any images that have poor quality or image blur please annotate as accurately as possible. Annotate as close to the refined pixels as possible. |
- Notice how the subject’s hand is blurred and might give us difficulty when trying to annotate. Try your best to annotate as accurately as possible in these situations, and make sure you don't leave them without annotation |
|
Subject in the dark |
Do NOT annotate these type of tasks |
This type of annotation is wrong. |
|
What to do if the annotation is good quality but the task is “good data? No” |
Sometimes taskers annotate the task even though the task is bad data (good data attribute is marked as “no”) and should not be annotated
If the annotation is incorrect or low quality then the annotation should be deleted
But if the annotation is correct or good quality then it is not required to delete the annotation, you can leave it annotated!
You should only be sure that the global attribute of “good data?” is marked as “No” |
In this case, the task is bad data due to the subject’s knee being in frame and according to Criteria #5 of the Out of Scope Criteria it should be bad data |


Out of Scope Criteria
There are 12 major criteria that will determine if the task should be annotated or not.
- Too small faces
The distance between eyebrows and chin needs to be at least 20% (1/5) of the image height. This only applies to the person(s) in the foreground. Persons in the background may be smaller and should be labeled as background. - Too small foreground
The foreground should cover at least 4% of the image area. - Too large foreground
The foreground should cover at most 95% of the image area. - Too large hands
The hands should cover at most 50% of the image area. - Knee in image
We don’t want full body images, for example a person standing up. The definition is that if a person’s knee is visible then it is out of scope. - No eye in image
We want images showing a fair part of the face. We define this as at least one eye should be in the image. The eye may be occluded by a hand as long as the position of the eye is inside the image. - Person occluded by objects (tables, microphones, etc.)
Images with objects fully contained in the area of the person can be kept. - Rotated images
Small rotations (±20 degrees) are acceptable. Rotations ±90 degrees or upside-down are out of scope. - More than 2 foreground people
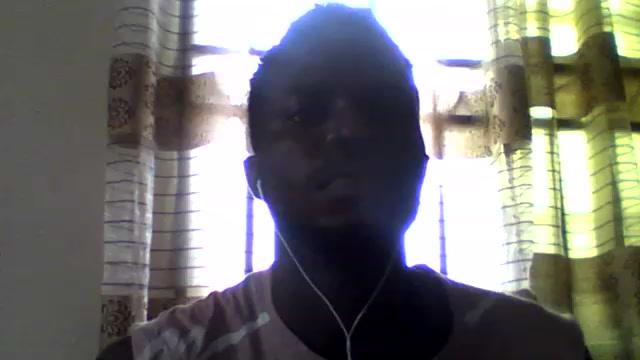
Persons in the background (> 2m away) are not counted and should be labeled as background. - Too dark or heavily overexposed image
Images that are practically impossible to manually label. - Broken image
Images with coding artifacts or a logo from a virtual webcam. - Padded images
Images with black areas (left/right or top/bottom) that crop the foreground. If the foreground doesn’t touch the cropped areas, the image can be kept.
If one of these criteria applies to the task at hand, then the task should be marked as “good data?: No” and not be annotated
Out of Scope Examples
|
Image |
Criteria |
|
|
Criteria 5 &6: No eye in image. |
|
|
Criteria 8: 90 degrees rotated. |
|
Criteria 4: Too large hands. |
|
|
|
Criteria 11: Broken image. |
|
|
Criteria 11: Broken image. |
|
|
Criteria 10: Too dark.
|
|
|
Criteria 7: Person occluded by object (keyboard) |
|
|
Criteria 5: Knee in frame. |
|
|
Criteria 12: Padded image where the foreground is cropped by the black padding. |
|
|
Criteria 3: Too large foreground, covering more than 95% of the image area. |
|
|
Criteria 6: No eye in image. |
|
|
Criteria 5 & 7: Knee in frame. |
|
|
Criteria 10: Too dark. |


In Scope Examples
Remember that these next images are examples of tasks that should be annotated.
|
|
Even if no eyes are visible, the position of at least one eye is within the image. |
|
|
Even if the exposure is poor, it is possible to label this image correctly. |
|
|
There can be people in the background with faces smaller than 20% of the image height. Only label the gentleman front and center of the image |


Annotation Rules
|
Rule |
Description |
Example |
|
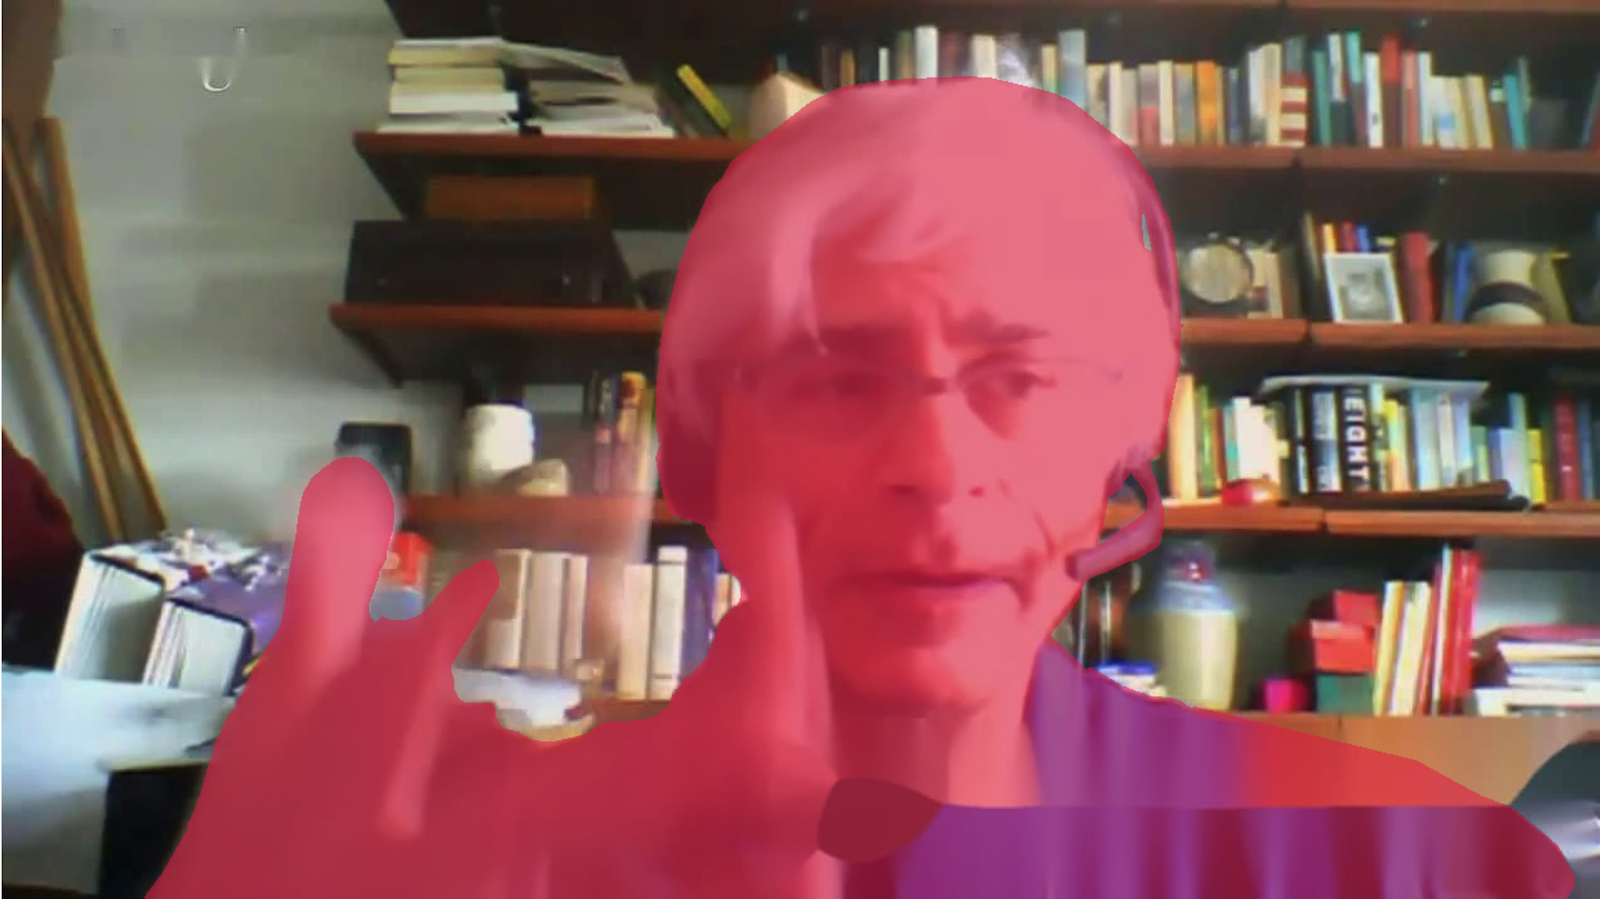
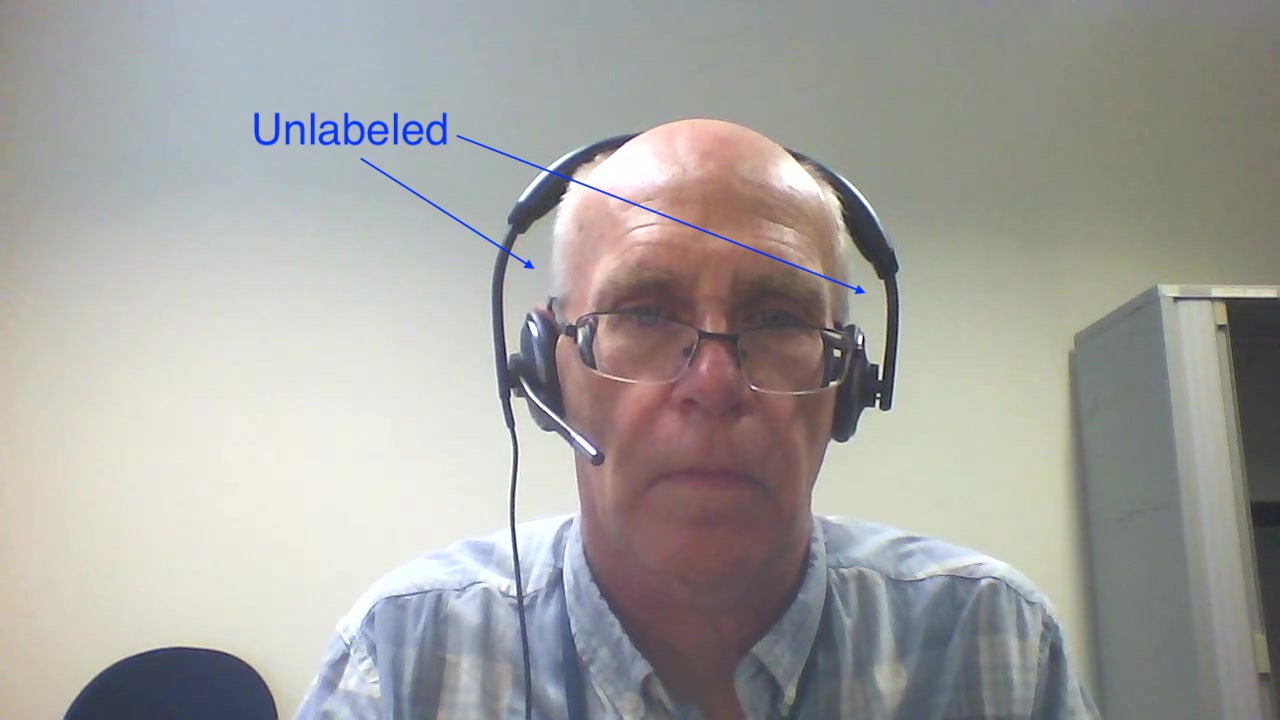
“Person” vs. “Unlabeled” |
- Please annotate any visible part of the subject as “Person”
- Additionally, if the subject is wearing any headsets/headphones, glasses, microphones, accessories or jewelry - please include them in the “Person” annotation
- Gaps or spaces between the subject and the objects they are wearing (such as a headset seen in the image to the right) should be left unlabeled
- If the subject is attached to or holding an object, only label the parts of the object that occlude the person. Do not label other parts of the object. See example here.
|
Here is an example of what should be labeled as “Person” and what should be left unlabeled
**notice the microphone included in the headset should also be labeled as person
|
|
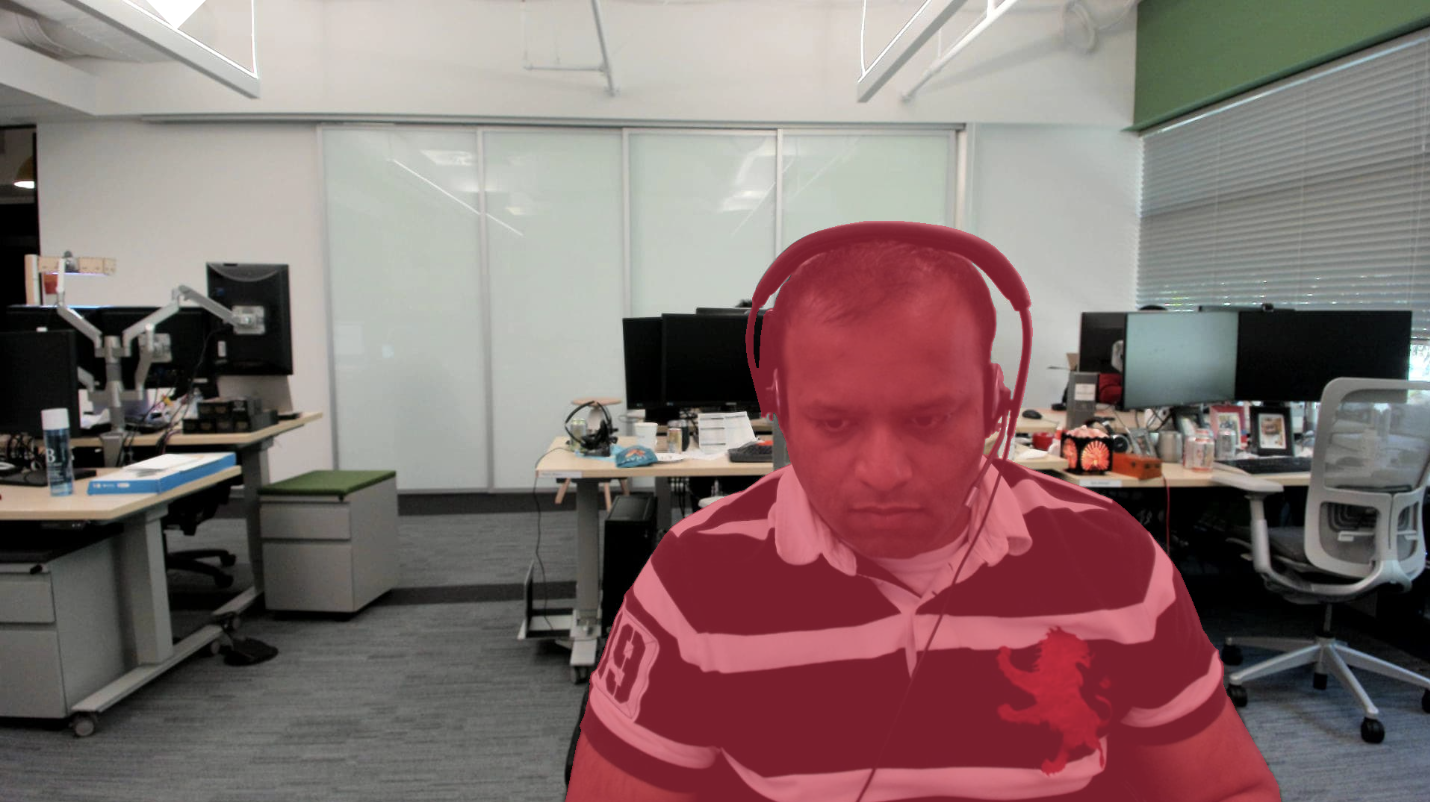
“Person” vs. “Unlabeled” cont. (For objects occluding the subject) |
- Accessories or objects that occlude (overlap) with the subject should be labeled as “Person”
- If an object is partially occluding the subject, only the part that is in front of the subject should be labeled as “Person” |
|
|
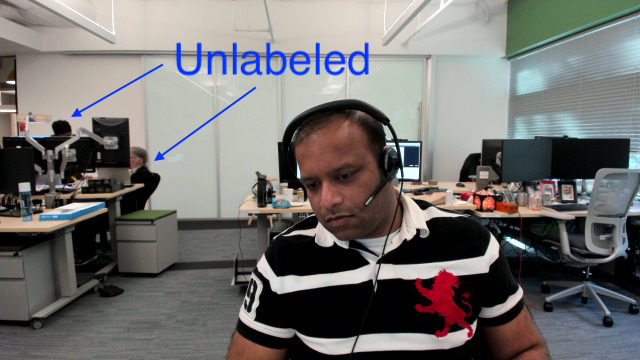
Additional Subjects |
If there are other people in a task, please annotate as ‘Person’ only if they are approximately <4 ft. from the camera (ego) AND looking at the camera.
If the subject is too far away or too unclear to accurately annotate - they can be left unlabeled |
|
|
Details |
Particular things to annotate as “Person”:
You DO NOT need to label thin strands of hair in the “Person”. See example to the right for reference. |
Here is an example of how to annotate accessories (headset, eyewear, etc.) as “Person” Correct annotation example: Notice how we include the microphone of the head et, but NOT the cable Incorrect annotation example:
Here are examples of how NOT to annotate thin strands of hair: CORRECT annotation example:
INCORRECT annotation example:
|
|
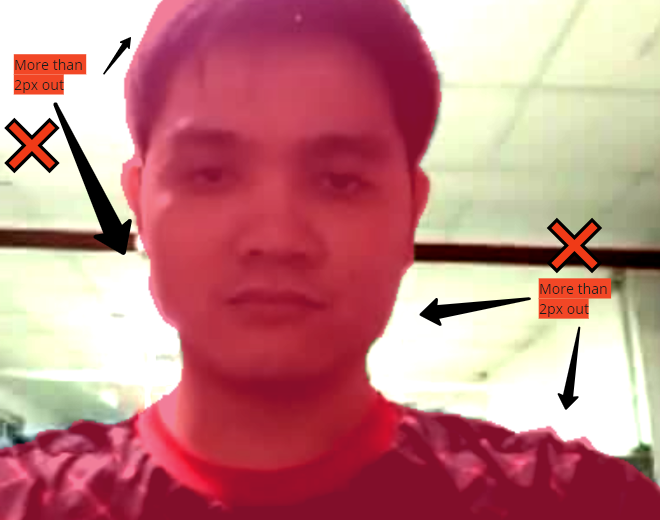
Pixel Threshold (+/- 2px) |
- Please make sure annotations are within a 2 pixel threshold in relation to the subject! - Each annotation should be as accurate as possible to avoid segmentation bleeding or misclassification errors |
Example: Below is an example of a task that stays true to the +/- 2 pixel threshold
CORRECT: INCORRECT: |


Labels & Attributes Description/Examples


Critical vs. Non-Critical Errors
|
Critical Errors |
Non-Critical Errors |
|
- Make sure all parts of a subject is labeled as “Person” - Make sure you do not label gaps in between headsets, and other head-wear as ‘Person’ - Make sure you do not label chairs, couches, or other pieces of furniture as “Person” -Make sure you label the microphone included in the headset even if they don't occlude the person
|
- Exclude wires from headsets/headphones as “Person” (remember they should be unlabeled if they are not occluding the subject!) - Stray hairs are non-critical |
Download & Print Link
Guidance
1-Mars Webcam Guide
!Shubh Shuruaat Start Pay ke Sath!
बिजनेस प्रूफ बिजनेस लोन लेने के लिए जरूरी डॉक्यूमेंट - A
Unsecured MSME Business Loan
Loan Eligibility Criteria Documentation Required
Bank Loan Knowledge Return Home Page
Start-Pay-YouTube
startpayonline.com/loan Return Home Page
STARTPAYONLINE
Check Cibil Score Online & Get Your Credit Report For Free
Work Surveys - Other's Job
Remote Freelancer Hub
Get Your FREE Remote Account Today!
Remote Freelancer Hub
Get 14% Off Remote's EOR Service
नवीनतम उपलब्ध सर्वेक्षणों तक पहुंचने के लिए रिफ्रेश करें।

Terms & Conditions apply*